Monday, November 06, 2006

Kid's Christmas Crafts Christmas Tree Garland


Green paper or card stock (we used assorted scrapbooking papers)
Scissors
Hole punch
Craft glue
Sandpaper or brown construction or scrapbooking paper
Star-shaped shank buttons
Cord or string

Time needed: Under 1 Hour
1. Cut trees in various shapes and sizes from the papers and punch a hole at the top of each one. Add trunks by gluing a small strip of sandpaper facedown to the back of each tree.

2. To string the trees together, push the shank of a button through each punched hole, then thread a length of cord through the button shanks, knotting the cord around each one to keep the trees in place.

Kid's Christmas Crafts Tire Wreath Light Decoration


Binder clips
Outdoor holiday lights
Tire
Extension cord
Weatherproof bow (optional)

Time needed: About 1 to 2 Hours
1. First, use one of the clips to attach the midpoint of the light string to the top center of the tire's inside rim. (This will help you to evenly distribute the lights.)

2. Wrap each side of the light string around the tire so they meet at the bottom, then use the second binder clip to secure the nonplug end of the light string to the tire, as you did above.

3. Use the extension cord to connect the lights to an appropriate electrical outlet, and tie on a weatherproof bow, if you like.

Kid's Christmas Crafts Giant Peppermint Mailbox Decoration


3 Styrofoam disks, 1" thick and 10" in diameter
Tacky glue
Red metallic ribbon
Scissors
Straight pins
Clear cellophane
Twist ties
Wire or twine

Time needed: Under 1 Hour
1. Stack and glue the three Styrofoam disks together. Then cut 2 3/4 inch-wide red metallic ribbon into six 12-inch lengths, trimming both ends of each piece into points.

2. Glue the red ribbon onto the Styrofoam to form stripes. Start with one pointed end positioned near the center of the three-ply disk, then wrap the ribbon over the edge of the Styrofoam and glue the other end in place on the opposite side. Use straight pins to help hold the ends of the ribbons in place, then remove them once the glue has dried. Leave approximately 2 1/2 inches between the ribbons.

3. When all of the red stripes are in place, wrap the giant candy in a 30-inch square piece of clear cellophane, scrunching the ends together and securing with twist ties.

4. Attach the finished decoration to your mailbox with wire, twine, or a loop of strong tape. Just be sure to bring it in if the weather outside gets frightful.

Kid's Christmas Crafts Lollipop Tree


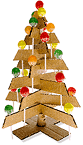
Corrugated cardboard that measures 9 inches across the base and 8 inches tall
Craft knife
Lollipops
11-inch wooden skewer
Bottle cork
Glue

Time needed: Under 1 Hour
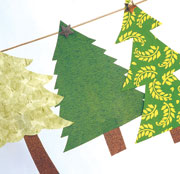
1. Cut two triangles from cardboard. (Note: The holes in the corrugated layer should run vertically.) Draw lines across each triangle at 1-inch intervals, then cut along the lines. Discard the top two strips from one triangle.

2. With a craft knife, cut narrow 1/2 inch deep notches (a parent's job) centered in the bottom edge of all the strips from the complete triangle except for the second strip from the top. Cut a similar notch in the top edge of the bottom strip in the other triangle.

3. Next, cut out an X-shaped cardboard base on which to assemble the tree. Glue an inverted bottle cork to the center of the base. Once the glue dries, insert the tip of a narrow (1/8-inch diameter) 11-inch wooden skewer far enough into the cork to secure it.

4. Now assemble the triangles into a tree. First, fit together the two bottom strips so that the notches interlock. Then slide them onto the skewer so that the blunt end passes through the center corrugation holes and they come to rest on the cork. Slide the next largest unnotched strip onto the skewer in like fashion. Add the matching notched strip, lock it onto the previous one, and then swivel the two so that they are at 45-degree angles to the bottom strips.

5. Add the remaining strips, alternating between unnotched and notched pieces and swiveling each locked pair slightly. Finally, "light up" the tree with lollipops by fitting the sticks into the holes in the "boughs."

Kid's Christmas Crafts Candy Stick Vase


Aluminum can
Candy
Double-sided foam mounting tape
Ribbon
Plastic cup

Time needed: Under 1 Hour
1. To make one, first snugly wrap 3 or 4 rings of double-sided foam mounting tape around a clean, dry, and labelless aluminum can (ours was 15 ounces).

2. Peel off the tape's protective covering to expose its second sticky side.

3. One at a time, attach colorful individually wrapped candy sticks (available at candy shops; we used 26) to the tape, setting them as close together as possible and pressing them firmly in place.

4. For a festive finish, tie a ribbon around the container. To use the vase for fresh flowers or plants, set a plastic cup inside the can as a liner before adding water.

Kid's Christmas Crafts Christmas Moose


2 chocolate wafer cookies
Royal icing
Toothpicks
2 orange circus peanuts, halved
2 caramel squares
3 pretzel pieces
1 brown mini M&M

Time needed: Under 1 Hour
1. For the body, glue together the wafer cookies with icing. Poke four toothpick legs into the body and add a circus peanut half for each foot.

2. With a toothpick, attach the two caramels together as shown, then affix them with icing to the body.

3. Poke two pretzel pieces into the caramels for antlers. Using icing, glue on an M&M nose and a pretzel tail.

Kid's Christmas Crafts Candy Garland


Start with two wrapped candies (we like striped starlight mints) and using ribbon, tie a twisted plastic end of one to an end of the second mint. Continue until your chain has enough candies for your countdown. Hang your garlands from the mantel or from doorknobs. Each day, untie and eat one piece of candy.

Kid's Christmas Crafts Greeting Card Tree Holder


Corrugated cardboard
X-Acto knife
Green fleece or felt
Glue stick
Hot glue gun
Cording or ribbon
Yellow construction paper or gold glitter

The size of your tree will depend on how many cards you plan to display on it (the one shown here is 27 by 37 inches). Measure and mark off the height and width on a piece of corrugated cardboard. Draw a simple tree shape; then, using an X-Acto knife, cut it out (a parent's job). Trace around the cardboard tree on a piece of fleece or felt and cut out the material. Run the glue stick all over the cardboard and press the material in place. Using a hot glue gun, attach cording or ribbon around the tree's perimeter. To make the hanger, cut out a 2-by-5-inch strip of cardboard and cut a hole in the center of one end of it. Glue the hanger to the back of the tree so that the hole comes to just above the top point. Cut out a star from another piece of cardboard, glue it onto the top of the tree, and cover with yellow construction paper or gold glitter.

CRAFTER'S TIP
To hang the cards, use thumbtacks or decorative straight pins.

Kid's Christmas Crafts Photo Ornament


Close-up photos of your kids
Print-outs of all of your children's names, and typed holiday messages
Copy service
Circle cutter
Card stock
Hole puncher
Thick, gold paper
Double-sided tape
Ribbon

Time needed: Afternoon or Evening
1. Start with one close-up photo of each child. From your computer, print out a sheet with each child's name and age and also the messages for the front cover ("Merry Christmas") and back cover ("Love, [Your Family]").

2. Make copies with a photo on one side and the child's name on the back, then use a circle cutter to cut out the photos and the card stock covers.

3. Cut out hangers from thick gold paper, hole-punch them, then attach one to the back of each circle with double-sided tape.

4. Tie the circles together through the hangers with a ribbon.

Tips:
Assemble all the parts, then have your kids join the assembly line to put the cards together.